How to Harvest and Cure Garlic

How to Harvest and Cure Garlic
Is your garlic ready to harvest? Then let’s get going! Check out these pro tips on how to harvest and cure your garlic for long-term use, storage, and re-planting.

How to Harvest
First, make sure your garlic is ready to harvest. Garlic harvested too soon may not have reached optimum size, while garlic harvested too late may not store well.
Stop watering 7 days before harvest if possible. Dry garlic bulbs will cure better than excessively wet ones.
To harvest the bulbs, grasp the stalk firmly close to the ground and work the bulb loose. If the root system is deep or the ground has a lot of clay, working a small hand shovel around the edges can help loosen the bulb without breaking the stem, but be careful not to nick the bulb with the shovel (it may be a bigger bulb than you expect!)
Keep the harvested bulbs in shade as you pull the others. Bulbs should not be exposed to the sun any longer than necessary.
What about if a stem breaks? No worries, if a stem breaks, the bulb can still be harvested and cured just fine without the stem.

How to Clean the Bulb
Once the bulbs are harvested, they need to be cleaned before going to curing. Dirty bulbs can retain moisture, which can cause the bulb to rot prematurely. It is best to clean at harvest time rather than wait until later. Dirt left on the bulb will stain through multiple layers of wrappers, permanently lowering the visual appeal, so it is important to clean the bulb immediately after harvesting.
If you will be curing in temperature-controlled storage or live in a dry climate, it is possible to wash the bulb with water to clean. However, if you will curing outdoors in the humid south, it is usually better to keep the bulb as dry as possible.
To clean a bulb without washing, grasp the lowest green leaf on the stalk and pull off, exposing a clean wrapper layer on the bulb. Do not remove more leaves (layers of bulb wrappers) than necessary.
It is best to remove the roots before curing as well. Cut the roots off with a knife or heavy-duty scissors. Roots harbor dirt and pathogens, as well as absorb moisture from the atmosphere and hinder curing.
How To Cure Garlic
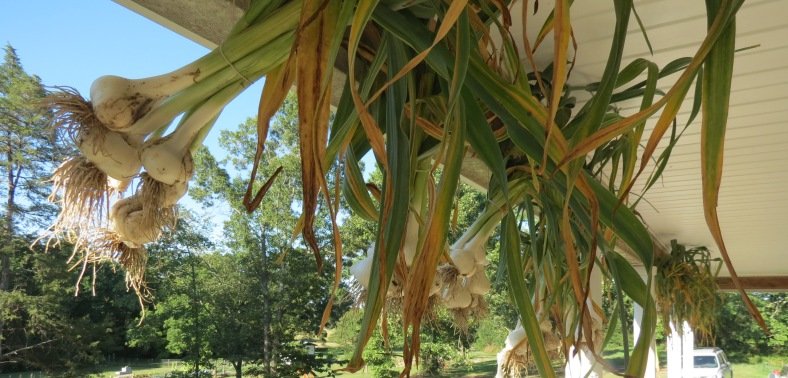
To cure the garlic, gather into bundles of 8-12 and hang to dry. A 10" piece of heavy cotton twine with a loop tied in each end works well. Wrap the twine around the bundle, pass one loop through the other, then hang the bundle by the other loop.
Our first curing area was our long front porch. We put screws along the header board and hung the bundles from the screws. We currently cure in an indoor shop building with long conduit rods running length of the roof vault. We loop the string over wire ‘S” hooks and hang the hooks on the conduit rods.
Alternatively, garlic can be cut off the stem at harvest time and cured on a screen or other open-weave surfaces. A fan underneath the screen can help improve the airflow, but should not blow directly on the garlic.
Garlic cures in two to four weeks, depending on the conditions. Garlic is done curing once the necks are dry and brittle. Check stems by cutting or by piercing with your fingernail. If the inner stem is still green or and moist, the garlic is not cured yet.
Once the garlic is cured, you can cut it off the stalk for compact storage or leave it on the stalk.
Garlic should be stored at room-temperature with good ventilation. Properly cured and stored, garlic will last from 3-9 months, depending on bulb size (smaller bulbs store longer). Use the bulbs, or replant in the fall.
Read our article here for more information on storing garlic.
I hope this answers your questions! Grow your own beautiful garlic with our top-performing seed garlic! Garlic is a nutritious and delicious addition to every garden and kitchen. Free Shipping on Every Order!
Need more tips on when to harvest garlic? Check out the previous blog for helpful tips on timing the harvest.

We’ve shipped garlic all over America
We’d love to add you to our garlic growers map!